
Hello World
Let's write and deploy our first smart contract!
https://play.onflow.org/83315e10-8a9d-40d1-9f4a-877ca93eb93c
The tutorial will be asking you to take various actions to interact with this code.
A smart contract is a program that verifies and executes the performance of a contract without the need for a trusted third party. Programs that run on blockchains are commonly referred to as smart contracts because they mediate important functionality (such as currency) without having to rely on a central authority (like a bank).
Before you get started with Flow, you need to understand how accounts and transactions are modeled.
Accounts and Transactions
Like most other blockchains, the programming model in Flow is centered around accounts and transactions. All persistent state is stored in accounts. The interfaces to this state (the ways to interact with it) are also stored in accounts. All code execution takes place within transactions, which are blocks of code that are submitted by external users to interact with the persistent state, which includes directly modifying account storage.
Each user has an account controlled by one or more private keys. This means that support for accounts/wallets with multiple controllers is built into the protocol by default.
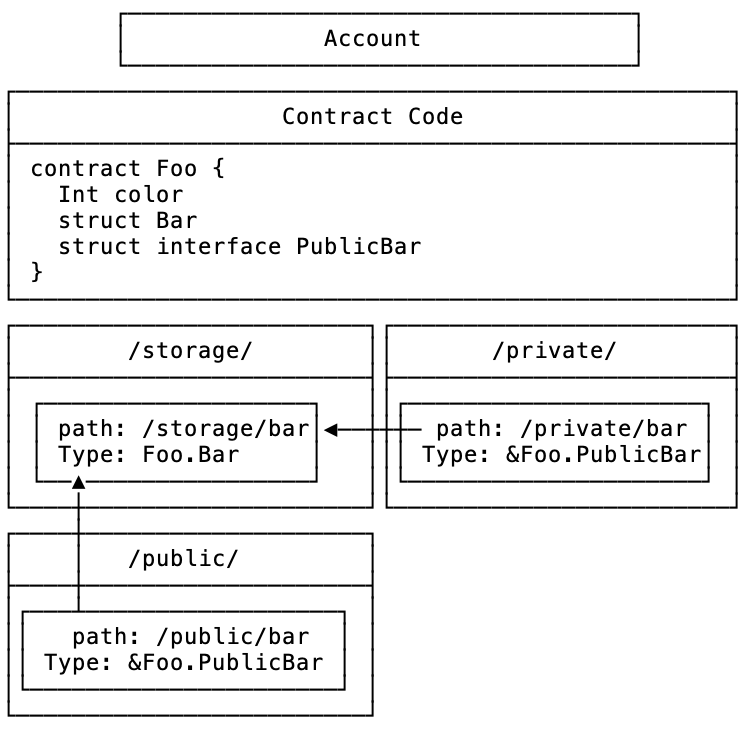
An account is divided into two main areas:
The first area is the contract area. This is the area that stores any number smart contracts that contain type definitions, fields, and functions that relate to a common functionality. This area also holds contract interfaces, which are basically program guidelines that other contracts can import and implement. This area cannot be directly read from in a transaction, unless the transaction is just reading the code deployed to an account. The owner of an account can directly add, remove, or update/overwrite contracts that are stored in it.
The second area is the account filesystem. This area is where an account stores the objects that they own and the capabilities for controlling how these objects are accessed.
Objects are stored under paths in the account filesystem. Paths consist of a domain and an identifier.
Paths start with the character /, followed by the domain, the path separator /, and finally the identifier. For example, the path /storage/test has the domain storage and the identifier test.
There are only three valid domains which represent the three areas in the account filesystem: storage, private, and public.
Identifiers are custom and can be any name you want them to be to indicate what is stored in that path.
- The
storagedomain is where all objects (such as structs and resource objects representing tokens or NFTs) are stored. It is only directly accessible by the owner of the account. - The
privatedomain is like a private API. You can optionally store capabilities to any of your stored assets here. Only the owner and anyone they give access to can use these interfaces to call functions that are defined in your private assets. Users will commonly store private capabilities here that refer to other accounts private objects. - The
publicdomain is kind of like your account's public API. The owner can link capabilities here that anyone else in the network can access to interact with the private assets that are stored in the account.
A Transaction in Flow is defined as an arbitrary-sized block of Cadence code that is signed by one or more accounts.
Transactions have access to the /storage/ and /private/ domains of the accounts that signed the transaction and can read and write to those domains,
as well as read and call functions in public contracts and the public domains in other users` accounts.
Creating a Smart Contract
We will start by writing a smart contract that contains a public function that returns "Hello World!".
First, you'll need to follow this link to open a playground session with the Hello World contracts, transactions, and scripts pre-loaded: {" "}
https://play.onflow.org/83315e10-8a9d-40d1-9f4a-877ca93eb93c Open the Account 0x01 tab with the file called
HelloWorld.cdc.
HelloWorld.cdc should contain this code:
pub contract HelloWorld {

    // Declare a public field of type String.
    //
    // All fields must be initialized in the init() function.
    pub let greeting: String

    // The init() function is required if the contract contains any fields.
    init() {
        self.greeting = "Hello, World!"
    }

    // Public function that returns our friendly greeting!
    pub fun hello(): String {
        return self.greeting
    }
}
A contract is a collection of code (its functions) and data (its state) that lives in the contract area of an account in Flow. Accounts can have one or more contracts and/or contract interfaces, and these can be freely added, removed, or updated (with some restrictions) by the owner of the account.
The line pub let greeting: String declares a public (pub) state constant (let) called greeting of type String.
We would have used var if we wanted to declare a variable.
The pub keyword is an example of an access control specification meaning that it can be accessed in all scopes, but not written to in all scopes.
You can also use access(all) interchangeably with pub if you prefer something more descriptive.
Please refer to the Access Control section of the language reference to learn more about the different levels of access control permitted in Cadence.
The init() section is called the initializer. It is a function that is only run when the contract is created and never again.
In this example, the initializer sets the greeting field to "Hello, World!".
Next is a public function declaration that returns a value of type String.
Anyone who imports this contract can read the public fields, use the public types, and call the public contract functions; i.e. the ones that have pub or access(all) specified.
Now we can deploy this contract to your account and run a transaction that calls its function.
Deploying Code
Now that you have some Cadence code to work with, you can deploy it to your account.
Make sure that the account 0x01 tab is selected and that the
HelloWorld.cdc file is in the editor.
Click the deploy button to deploy the contents of the editor to account 0x01.
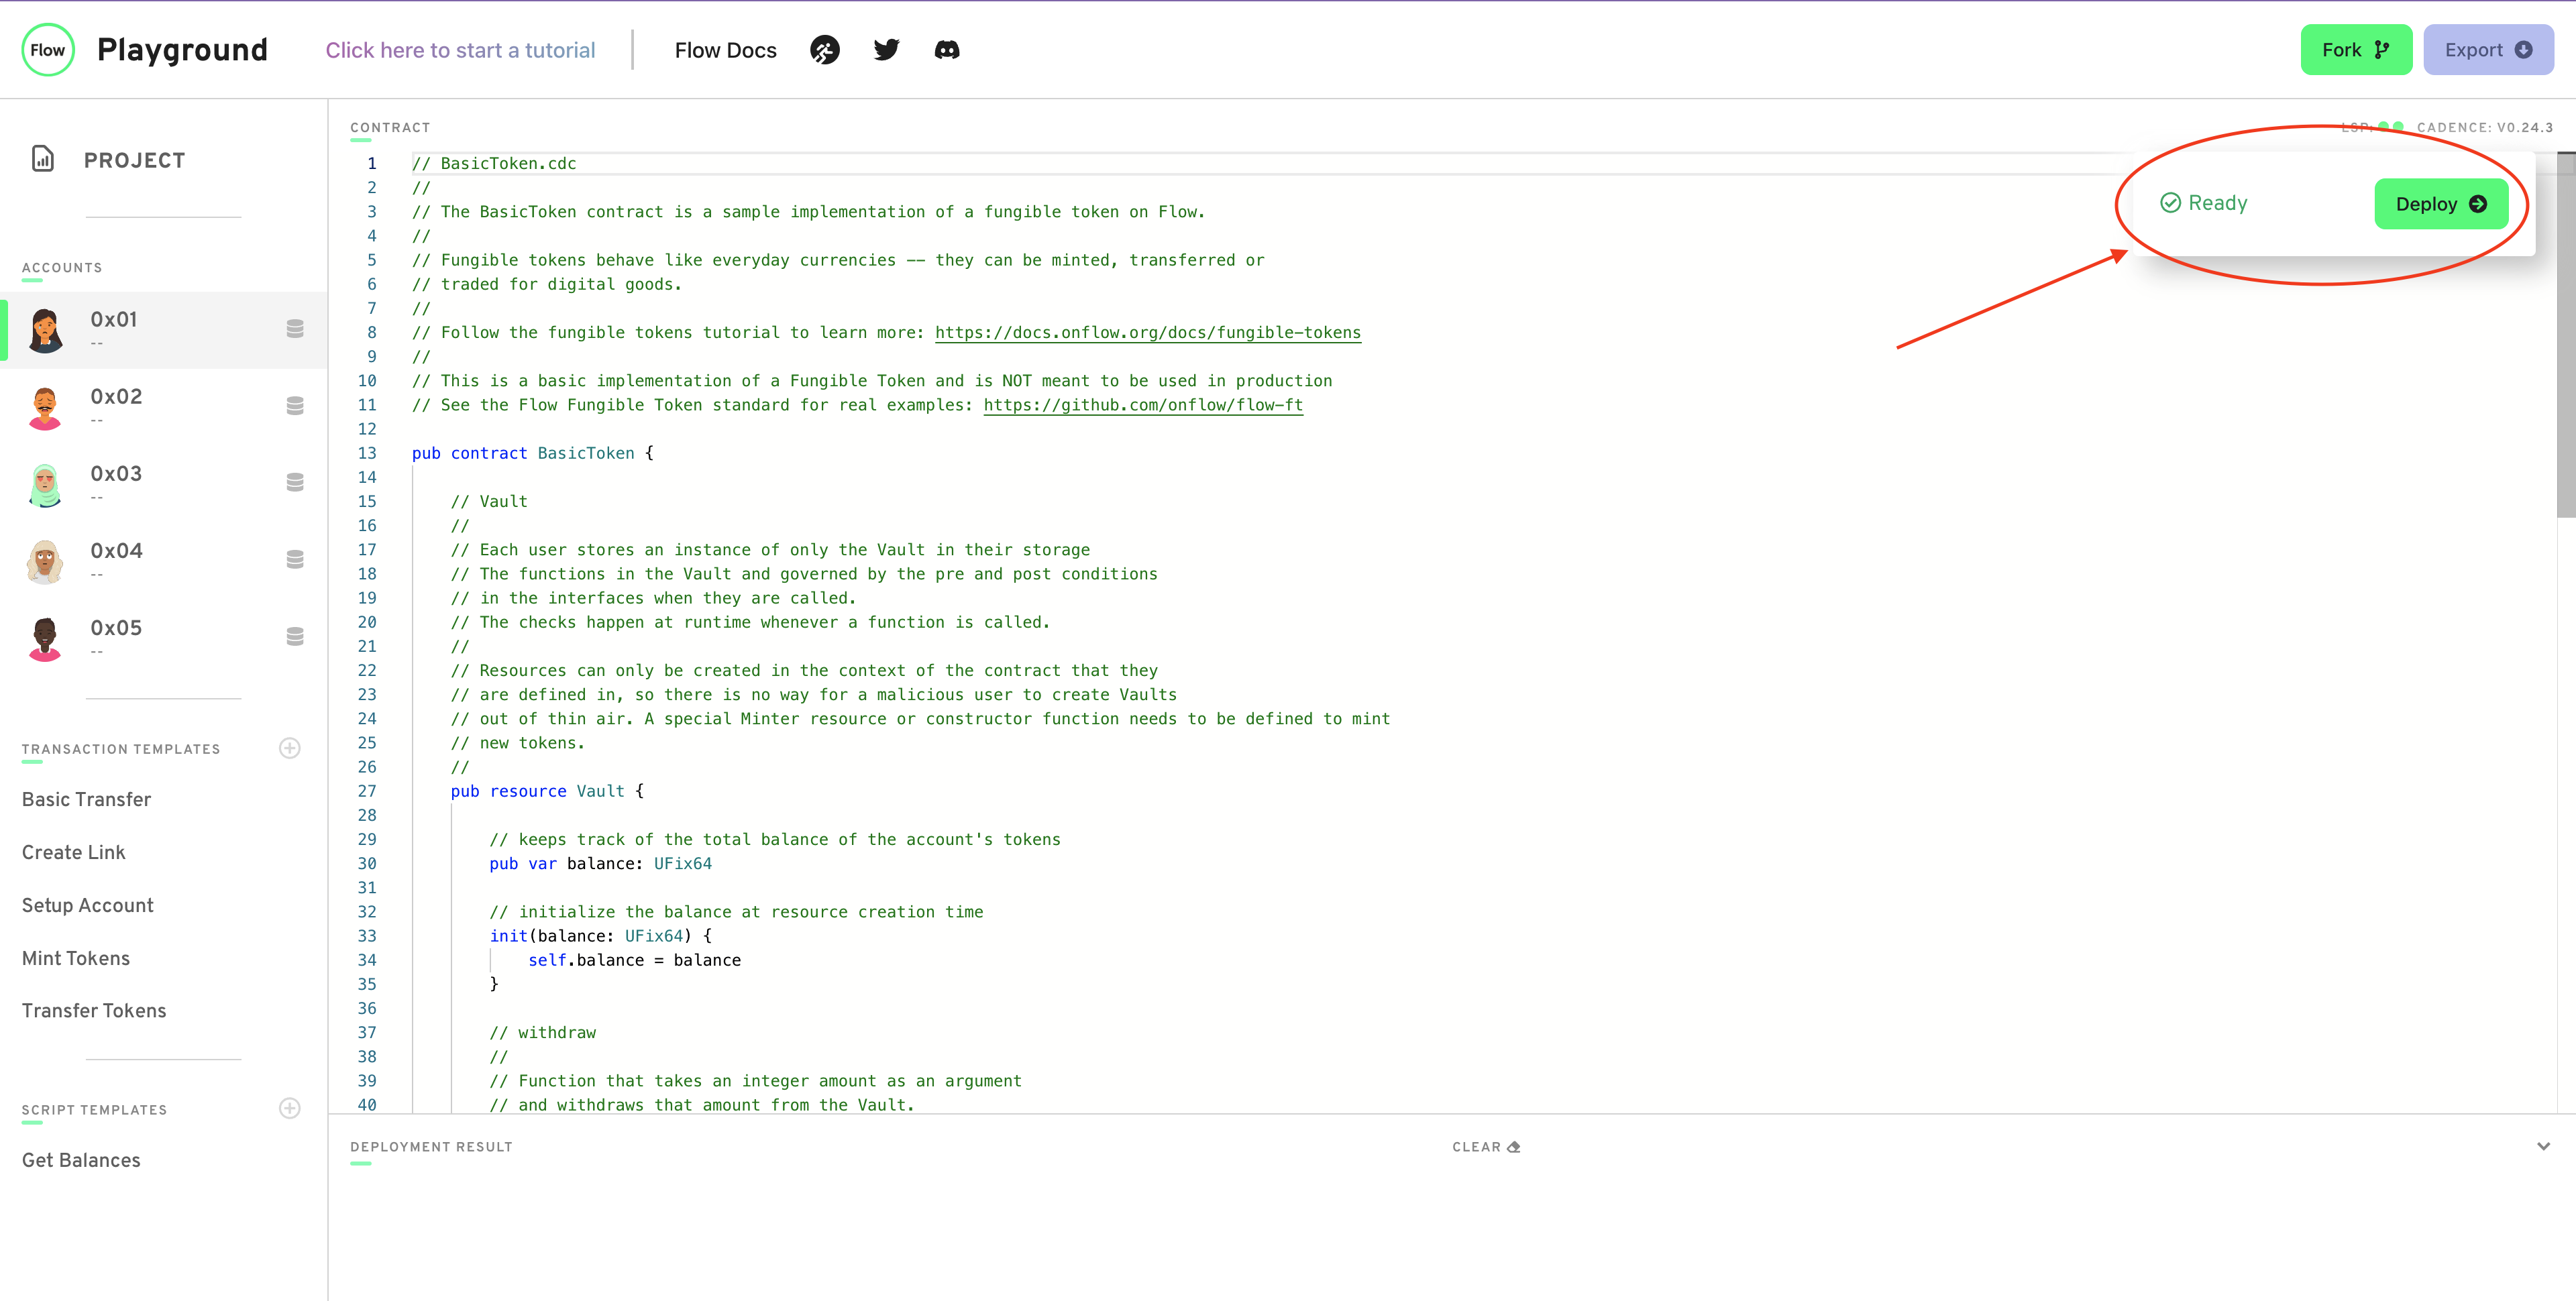
You should see a log in the output area indicating that the deployment succeeded. (Don't worry if the transaction number or block is different.)
Deployed Contract To: 0x01
You'll also see the name of the contract show up in the selected account tab underneath the number for the account.
This indicates that the HelloWorld contract has been deployed to the account.
You can always look at this tab to verify which contracts are in which accounts, but there can only be one contract per account.
Creating a Transaction
Open the transaction named Say Hello
Say Hello should contain this code:
import HelloWorld from 0x01

transaction {

    // No need to do anything in prepare because we are not working with
    // account storage.
    prepare(acct: AuthAccount) {}

    // In execute, we simply call the hello function
    // of the HelloWorld contract and log the returned String.
    execute {
        log(HelloWorld.hello())
    }
}
This is a Cadence transaction. A transaction can contain arbitrary code that imports from other accounts, interact with account storage, interact with other accounts, and more.
To interact with a smart contract, the transaction first needs to import that smart contract by retrieving its definition from the address where it is stored. This imports the interface definitions, resource definitions, and public functions from that contract so that the transaction can use them to interact with the contract itself or with other accounts that utilize that contract.
To import a smart contract from another account, you type the line:
import {Contract Name} from {Address}
Transactions are divided into two main phases, prepare and execute.
- The
preparephase is the only place that has access to the signing accounts' privateAuthAccountobject.AuthAccounthas special methods that allow saving to and loading from/storage/, and creating/private/and/public/links to the objects in/storage/. (called capabilities, will be covered later) - The
executephase does not have access toAuthAccountand thus can only modify the objects that were removed in thepreparephase and call functions on external contracts and objects.
By not allowing the execute phase to access account storage, we can statically verify which assets and areas of the signers storage a given transaction can modify. Browser wallets and applications that submit transactions for users can use this to show what a transaction could alter, and users can have more confidence that they aren't getting fed a malicious or dangerous transaction via an application-generated transaction.
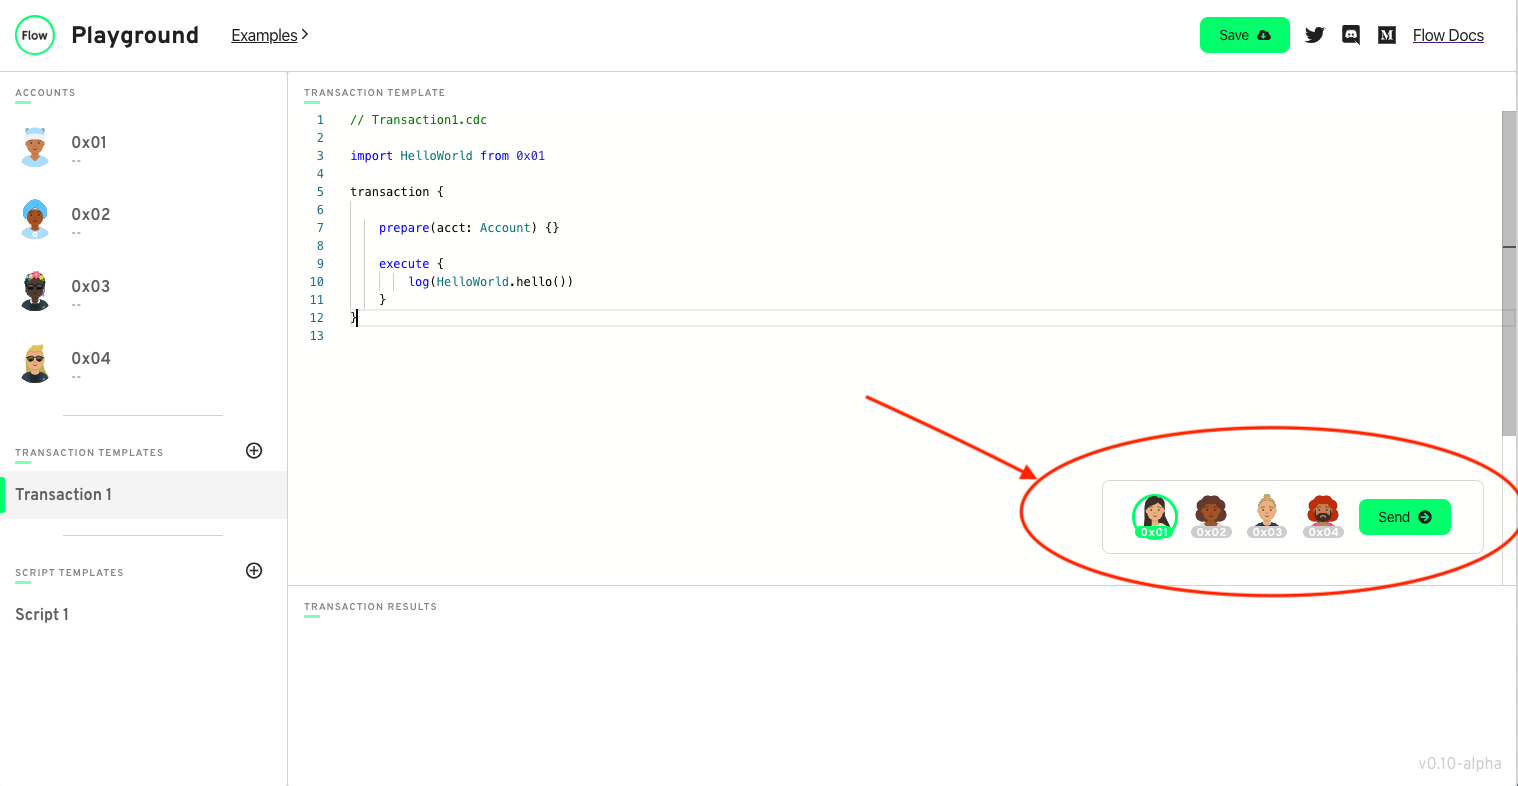
You can have multiple signers of a transaction by clicking multiple account avatars in the playground, but the number of parameters of the prepare block of the transaction NEEDS to be the same as the number of signers. If not, this will cause an error.
In this transaction, we are importing the contract from the address that it was deployed to and calling its hello function.
In the box at the top right of the editor, select Account 0x01 as the
transaction signer.
Click the Send button to submit the transaction
You should see something like this:
"Hello, World!"
Congratulations, you just executed your first Cadence transaction! :100:
Creating a Resource
Next, we are going to get some practice with an example that uses resources, one of the defining features in Cadence. A resource is a composite type like a struct or a class, but with some special rules.
Open the Account 0x02 tab with file named HelloWorldResource.cdc.
HelloWorldResource.cdc should contain the following code:
pub contract HelloWorld {

  // Declare a resource that only includes one function.
  pub resource HelloAsset {
    // A transaction can call this function to get the "Hello, World!"
    // message from the resource.
    pub fun hello(): String {
      return "Hello, World!"
    }
  }

  init() {
    // Use the create built-in function to create a new instance
    // of the HelloAsset resource
    let newHello <- create HelloAsset()

    // We can do anything in the init function, including accessing
    // the storage of the account that this contract is deployed to.
    //
    // Here we are storing the newly created HelloAsset resource
    // in the private account storage
    // by specifying a custom path to the resource
    self.account.save(<-newHello, to: /storage/Hello)

    log("HelloAsset created and stored")
  }
}
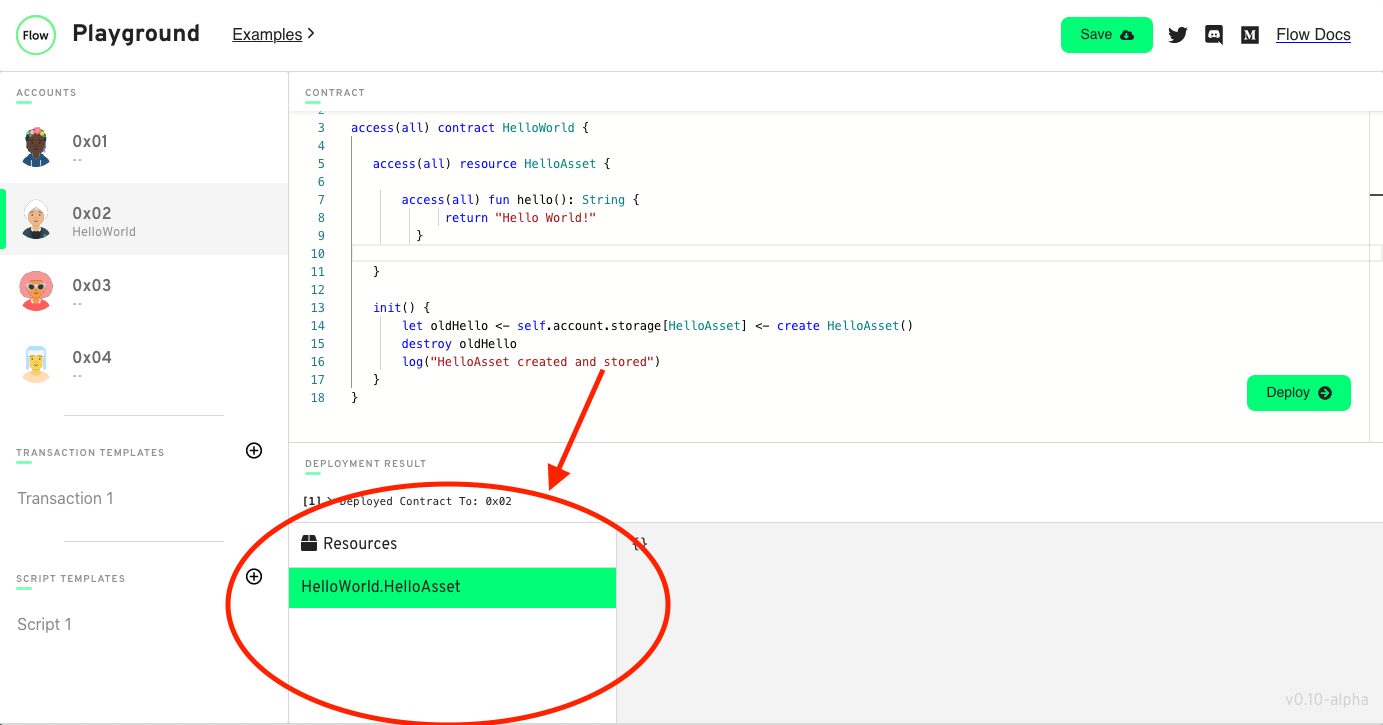
Deploy this code to account 0x02 using the Deploy button.
This is another example of what we can do with a contract. Cadence can declare type definitions within deployed contracts.
Any account can import these definitions and use them to interact with objects of those types.
This contract declares a definition for the HelloAsset resource.
Let's walk through this contract:
pub resource HelloAsset {
    pub fun hello(): String {
        return "Hello, World!"
    }
}
Resources are a composite type similar to a struct or a class because they can have any number of fields or functions within them. The difference is how code is allowed to interact with them. They are useful when you want to model direct ownership. Each instance of a resource exists in exactly one location and cannot be copied. They must be explicitly moved when accessed, making it difficult to lose accidentally.
Structs from other conventional programming languages are not an ideal way to represent this ownership because they can be copied. This means a coding error can easily result in creating multiple copies of the same asset, which breaks the scarcity requirements needed for these assets to have real value. We have to consider loss and theft at the scale of a house, a car, or a bank account with millions of dollars, or a horse. Resources, in turn, solve this problem by making creation, destruction, and movement of assets explicit.
init() {
// ...
This example also declares an init() function. All composite types like contracts, resources, and structs can have an optional init() function
that only runs when the object is initially created. Cadence requires that all fields must be explicitly initialized,
so if the object has fields, this function has to be used to initialize them.
Contracts also have read and write access to the storage of the account that they are deployed to
by using the built-in self.account object.
This is an AuthAccount object that gives them access to many different functions to interact with the private storage of the account.
In this contract's init function, the contract uses the create keyword to create an instance of the HelloAsset type and saves it to a local variable.
To create a new resource object, we use the create keyword followed by an invocation of the name of the resource with any init() arguments.
A resource can only be created in the scope that it is defined in.
This prevents anyone from being able to create arbitrary amounts of resource objects that others have defined.
let newHello <- create HelloAsset()
Here we use the <- symbol. This is the move operator. The move operator <- replaces the assignment operator = in assignments that involve resources.
To make assignment of resources explicit, the move operator <- must be used when:
- the resource is the initial value of a constant or variable,
- the resource is moved to a different variable in an assignment,
- the resource is moved to a function as an argument
- the resource is returned from a function.
When a resource is moved, the old location is invalidated, and the object moves into the context of the new location. Regular assignments of resources are not allowed because assignments only copy the value. Resources can only exist in one location at a time, so movement must be explicitly shown in the code.
Then it uses the AuthAccount.save function to store it in the account storage.
self.account.save(<-newHello, to: /storage/Hello)
A contract can refer to its member functions and fields with the keyword self.
All contracts have access to the storage of the account where they are deployed and can access that AuthAccount object with self.account.
AuthAccount objects have many different methods that are used to interact with account storage.
You can see the documentation for all of these in the Storage section of the language reference or in the glossary.
The save method saves an object to account storage. The type parameter for the object type is contained in <> to indicate what type the stored object is.
It can also be inferred from the argument's type.
The first parameter is the object that is being stored, and the to parameter is the path that the object is being stored at.
The path must be a storage path, i.e., only the domain storage is allowed as the to parameter.
If there is already an object stored under the given path, the program aborts.
Remember, the Cadence type system ensures that a resource can never be accidentally lost.
When moving a resource to a field, into an array, into a dictionary, or into storage, there is the possibility that the location already contains a resource.
Cadence forces the developer to handle the case of an existing resource so that it is not accidentally lost through an overwrite.
This is also why we can't let the execution reach the end of the block without doing anything with newHello,
and why save would fail if there is already a resource at the specified path.
In this case, this is the first transaction we have run with the selected account, so we know that the storage spot at `/storage/Hello is empty. In real applications, we would likely perform necessary checks and actions with the location we are storing to to make sure we don't abort the transaction because of an accidental overwrite.
Now that you have stored a resource in an account, you should see that resource show up in the Resources box below the editor.
This box indicates which resources are stored in the selected account, and the values of the fields inside those resources.
Right now, you should see that the HelloAsset resource is stored in account 0x02's storage and it has no fields.
Interacting with a Resource
Open the transaction named Load Hello.
Load Hello should contain the following code:
import HelloWorld from 0x02

// This transaction calls the "hello" method on the HelloAsset object
// that is stored in the account's storage by removing that object
// from storage, calling the method, and then putting it back in storage

transaction {

    prepare(acct: AuthAccount) {

        // load the resource from storage, specifying the type to load it as
        // and the path where it is stored
        let helloResource <- acct.load<@HelloWorld.HelloAsset>(from: /storage/Hello)

        // We use optional chaining (?) because the value in storage
        // may or may not exist, and thus is considered optional.
        log(helloResource?.hello())

        // Put the resource back in storage at the same spot
        // We use the force-unwrap operator `!` to get the value
        // out of the optional. It aborts if the optional is nil
        acct.save(<-helloResource!, to: /storage/Hello)
    }
}
This transaction imports the HelloWorld definitions from the account we just deployed them to, removes the HelloAsset object from storage,
and calls the hello() function of the stored HelloAsset resource.
To remove an object from storage, we use the load method.
let helloResource <- acct.load<@HelloWorld.HelloAsset>(from: /storage/Hello)
If no object is stored under the given path, the function returns nil. When the function returns, the storage no longer contains an object under the given path.
The type parameter for the object type to load is contained in <>.
A type argument for the parameter must be provided explicitly, which is @HelloWorld.HelloAsset here. (Note the @ symbol to specify that it is a resource)
The path from must be a storage path, i.e., only the domain /storage/ is allowed.
Next, we call the hello function and log the output.
log(helloResource?.hello())
We use ? because the values in the storage are returned as optionals.
Optionals are values that can represent the absence of a value.
Optionals have two cases: either there is a value of the specified type, or there is nothing (nil).
An optional type is declared using the ? suffix.
let newResource: HelloAsset?  // could either have a value of type `HelloAsset`
                              // or it could have a value of `nil`
Optionals allow developers to account for nil cases more gracefully.
Here, we explicitly have to account for the possibility that the helloResource object we got with load is nil.
Using ? "unwraps" the optional before calling hello, but only if the value isn't nil. If the value is nil, ? returns nil.
Because ? is used when calling the hello function, the function call only happens if the stored value is not nil.
In this case, the result of the hello function will be returned as an optional.
However, if the stored value was nil, the function call would not occur and the result is nil.
Next, we use save again to put the object back in storage in the same spot:
acct.save(<-helloResource!, to: /storage/Hello)
Remember, helloResource is still an optional, so we have to handle the possibility that it is nil.
Here, we use the force-unwrap operator (!). This operator gets the value in the optional if it contains a value,
and aborts the entire transaction if the object is nil.
It is a more risky way of dealing with optionals, but if your program is ever in a state where a value being nil
would defeat the purpose of the whole transaction, then the force-unwrap operator is a good choice to deal with that.
Refer to Optionals In Cadence to learn more about optionals and how they are used.
Select account 0x02 as the only signer. Click the Send button to submit
the transaction.
You should see something like this:
"Hello, World!"
Creating Capabilities and References to Stored Resources
In this example, we create a link and reference to your HelloAsset resource object, then use that reference to call the hello function.
A detailed explanation of what is happening in this transaction is below the transaction code so, if you feel lost, keep reading!
Open the transaction named Create Link.
Create Link should contain the following code:
import HelloWorld from 0x02

// This transaction creates a new capability
// for the HelloAsset resource in storage
// and adds it to the account's public area.
//
// Other accounts and scripts can use this capability
// to create a reference to the private object to be able to
// access its fields and call its methods.

transaction {
  prepare(account: AuthAccount) {

    // Create a public capability by linking the capability to
    // a `target` object in account storage.
    // The capability allows access to the object through an
    // interface defined by the owner.
    // This does not check if the link is valid or if the target exists.
    // It just creates the capability.
    // The capability is created and stored at /public/Hello, and is
    // also returned from the function.
    let capability = account.link<&HelloWorld.HelloAsset>(/public/Hello, target: /storage/Hello)

    // Use the capability's borrow method to create a new reference
    // to the object that the capability links to
    // We use optional chaining "??" to get the value because
    // result of the borrow could fail, so it is an optional.
    // If the optional is nil,
    // the panic will happen with a descriptive error message
    let helloReference = capability!.borrow()
      ?? panic("Could not borrow a reference to the hello capability")

    // Call the hello function using the reference
    // to the HelloAsset resource.
    //
    log(helloReference.hello())
  }
}
Ensure account 0x02 is still selected as a transaction signer.
Click the Send button to send the transaction.
You should see "Hello, World" show up in the console again. This is because we created a capability for the HelloAsset object,
stored the capability in /public/Hello, borrowed a reference from the capability,
and used our reference to call the hello method of the object.
Capabilities are kind of like pointers in other languages. The /storage/ domain of account storage is private,
but users will still want to allow other users to access the functionality of their private objects without having the ability to remove them.
In our example, the owner of HelloAsset might still want to let other people call the hello method.
This is what capabilities are for. They represent a link to an object in an account's storage that has the type specified when the link is created.
Capabilities do not have any meaningful functionality on their own, but every capability has a borrow method,
which creates a reference to the object that the capability is linked to.
This reference is used to read fields or call methods on the object they reference as if the owner of the reference had the actual object.
Note that this only allows access to field and methods. It does not allow copying, moving, or modifying the original object directly.
Let's break down what is happening in this transaction.
First, we create a capability that is linked to the private HelloAsset object in /storage/:
let capability = account.link<&HelloWorld.HelloAsset>(/public/Hello, target: /storage/Hello)
The HelloAsset object is stored in /storage/Hello, which only the account owner can access.
They want any user in the network to be able to call the hello method. So they make a public capability in /public/Hello.
To create a capability, we use the AuthAccount.link method to link a new capability to an object in storage.
The type contained in <> is the restricted reference type that the capability represents.
The capability says that whoever borrows a reference from this capability can only have access to the fields and methods
that are specified by the type in <>.
A reference is referred to by the & symbol. Here, the capability references the HelloAsset object,
so we specify <&HelloWorld.HelloAsset> as the type, which give access to everything in the HelloAsset object.
The first argument to the link function is the path where you want to store the capability
and the target argument is the path to the object in storage that is to be linked to.
To borrow a reference to an object from the capability, we use the capability's borrow method.
let helloReference = capability!.borrow()
    ?? panic("Could not borrow a reference to the hello capability")
This method creates the reference as the type we specified in <> in the link function.
Here we use the force-unwrap operator (!) because the capability is an optional. If the capability is nil the transaction will abort.
While borrowing the reference, we use optional chaining because the borrowing of the reference could fail.
The reference could be nil if the targeted storage slot is empty, is already borrowed, or if the requested type exceeds what is allowed by the capability.
We panic with a descriptive error message so the caller can know better what went wrong.
The reason we separate this process into capabilities and references is to protect against re-entrancy bugs where a malicious actor could call into an object multiple times. These bugs have plagued other smart contract languages. Only one reference to an object can exist at a time, so this type of vulnerability isn't possible for objects in storage.
Additionally, the owner of an object can effectively revoke capabilities they have created by moving the underlying object or destroying the link with the unlink method.
If the referenced object is moved or the link is destroyed, capabilities have been created from that link are invalidated.
You can find more detailed documentation about capabilities in the language reference.
Now, anyone can call the hello() method on your HelloAsset object by borrowing a reference with your public capability in /public/Hello!
Lastly, we call the hello() method with our borrowed reference:
// Call the hello function using the reference to the HelloAsset resource
log(helloReference.hello())
Executing Scripts
A script is a very simple transaction type in Cadence that cannot perform any writes to the blockchain and can only read the state of an account. It runs without permissions from any account.
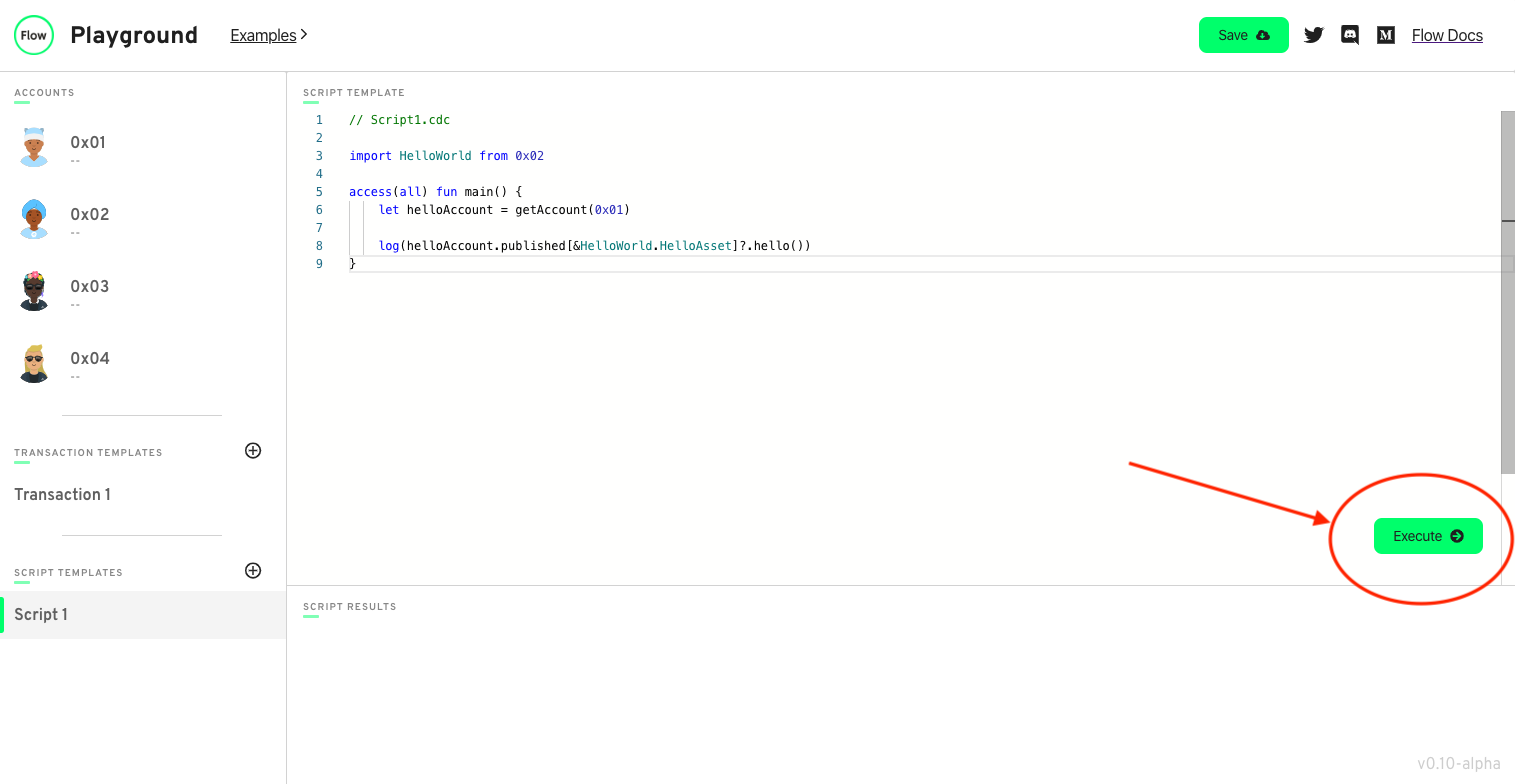
To execute a script, you write a function called pub fun main(). You can click the execute script button to run the script.
The result of the script will be printed to the console output.
Open the file Script1.cdc.
Script1.cdc should look like the following:
import HelloWorld from 0x02

pub fun main() {

    // Cadence code can get an account's public account object
    // by using the getAccount() built-in function.
    let helloAccount = getAccount(0x02)

    // Get the public capability from the public path of the owner's account
    let helloCapability = helloAccount.getCapability<&HelloWorld.HelloAsset>(/public/Hello)

    // borrow a reference for the capability
    let helloReference = helloCapability.borrow()
        ?? panic("Could not borrow a reference to the hello capability")

    // The log built-in function logs its argument to stdout.
    //
    // Here we are using optional chaining to call the "hello"
    // method on the HelloAsset resource that is referenced
    // in the published area of the account.
    log(helloReference.hello())
}
This script fetches the PublicAccount object with getAccount.
let helloAccount = getAccount(0x02)
The PublicAccount object is available to anyone in the network for every account,
but only has access to a small subset of functions that can only read from the /public/ domain in an account.
See more about accounts here: https://docs.onflow.org/cadence/language/accounts/
Then, it gets the capability that was created in Create Link.
// Get the public capability from the public path of the owner's account
let helloCapability = helloAccount.getCapability(/public/Hello)
To get a capability that is stored in an account, we use the account.getCapability function.
This function is available on AuthAccounts and on PublicAccounts. It returns a capability at the path that is specified,
also with the type that is specified. It does not check if the target exists,
but the borrow will fail if the capability is invalid.
After that, the script borrows a reference from the capability.
let helloReference = helloCapability.borrow()
Then, the script uses the reference to call the hello function and prints the result.
Lets execute the script to see it run correctly.
Click the Execute button in the playground.
You should see something like this print:
> "Hello, World"
> Result > "void"
Good work! You've deployed your first Cadence smart contracts and used transactions and scripts to interact with them!
Here are a few pointers on certain aspects of the Playground if you still need some clarification.
Accounts
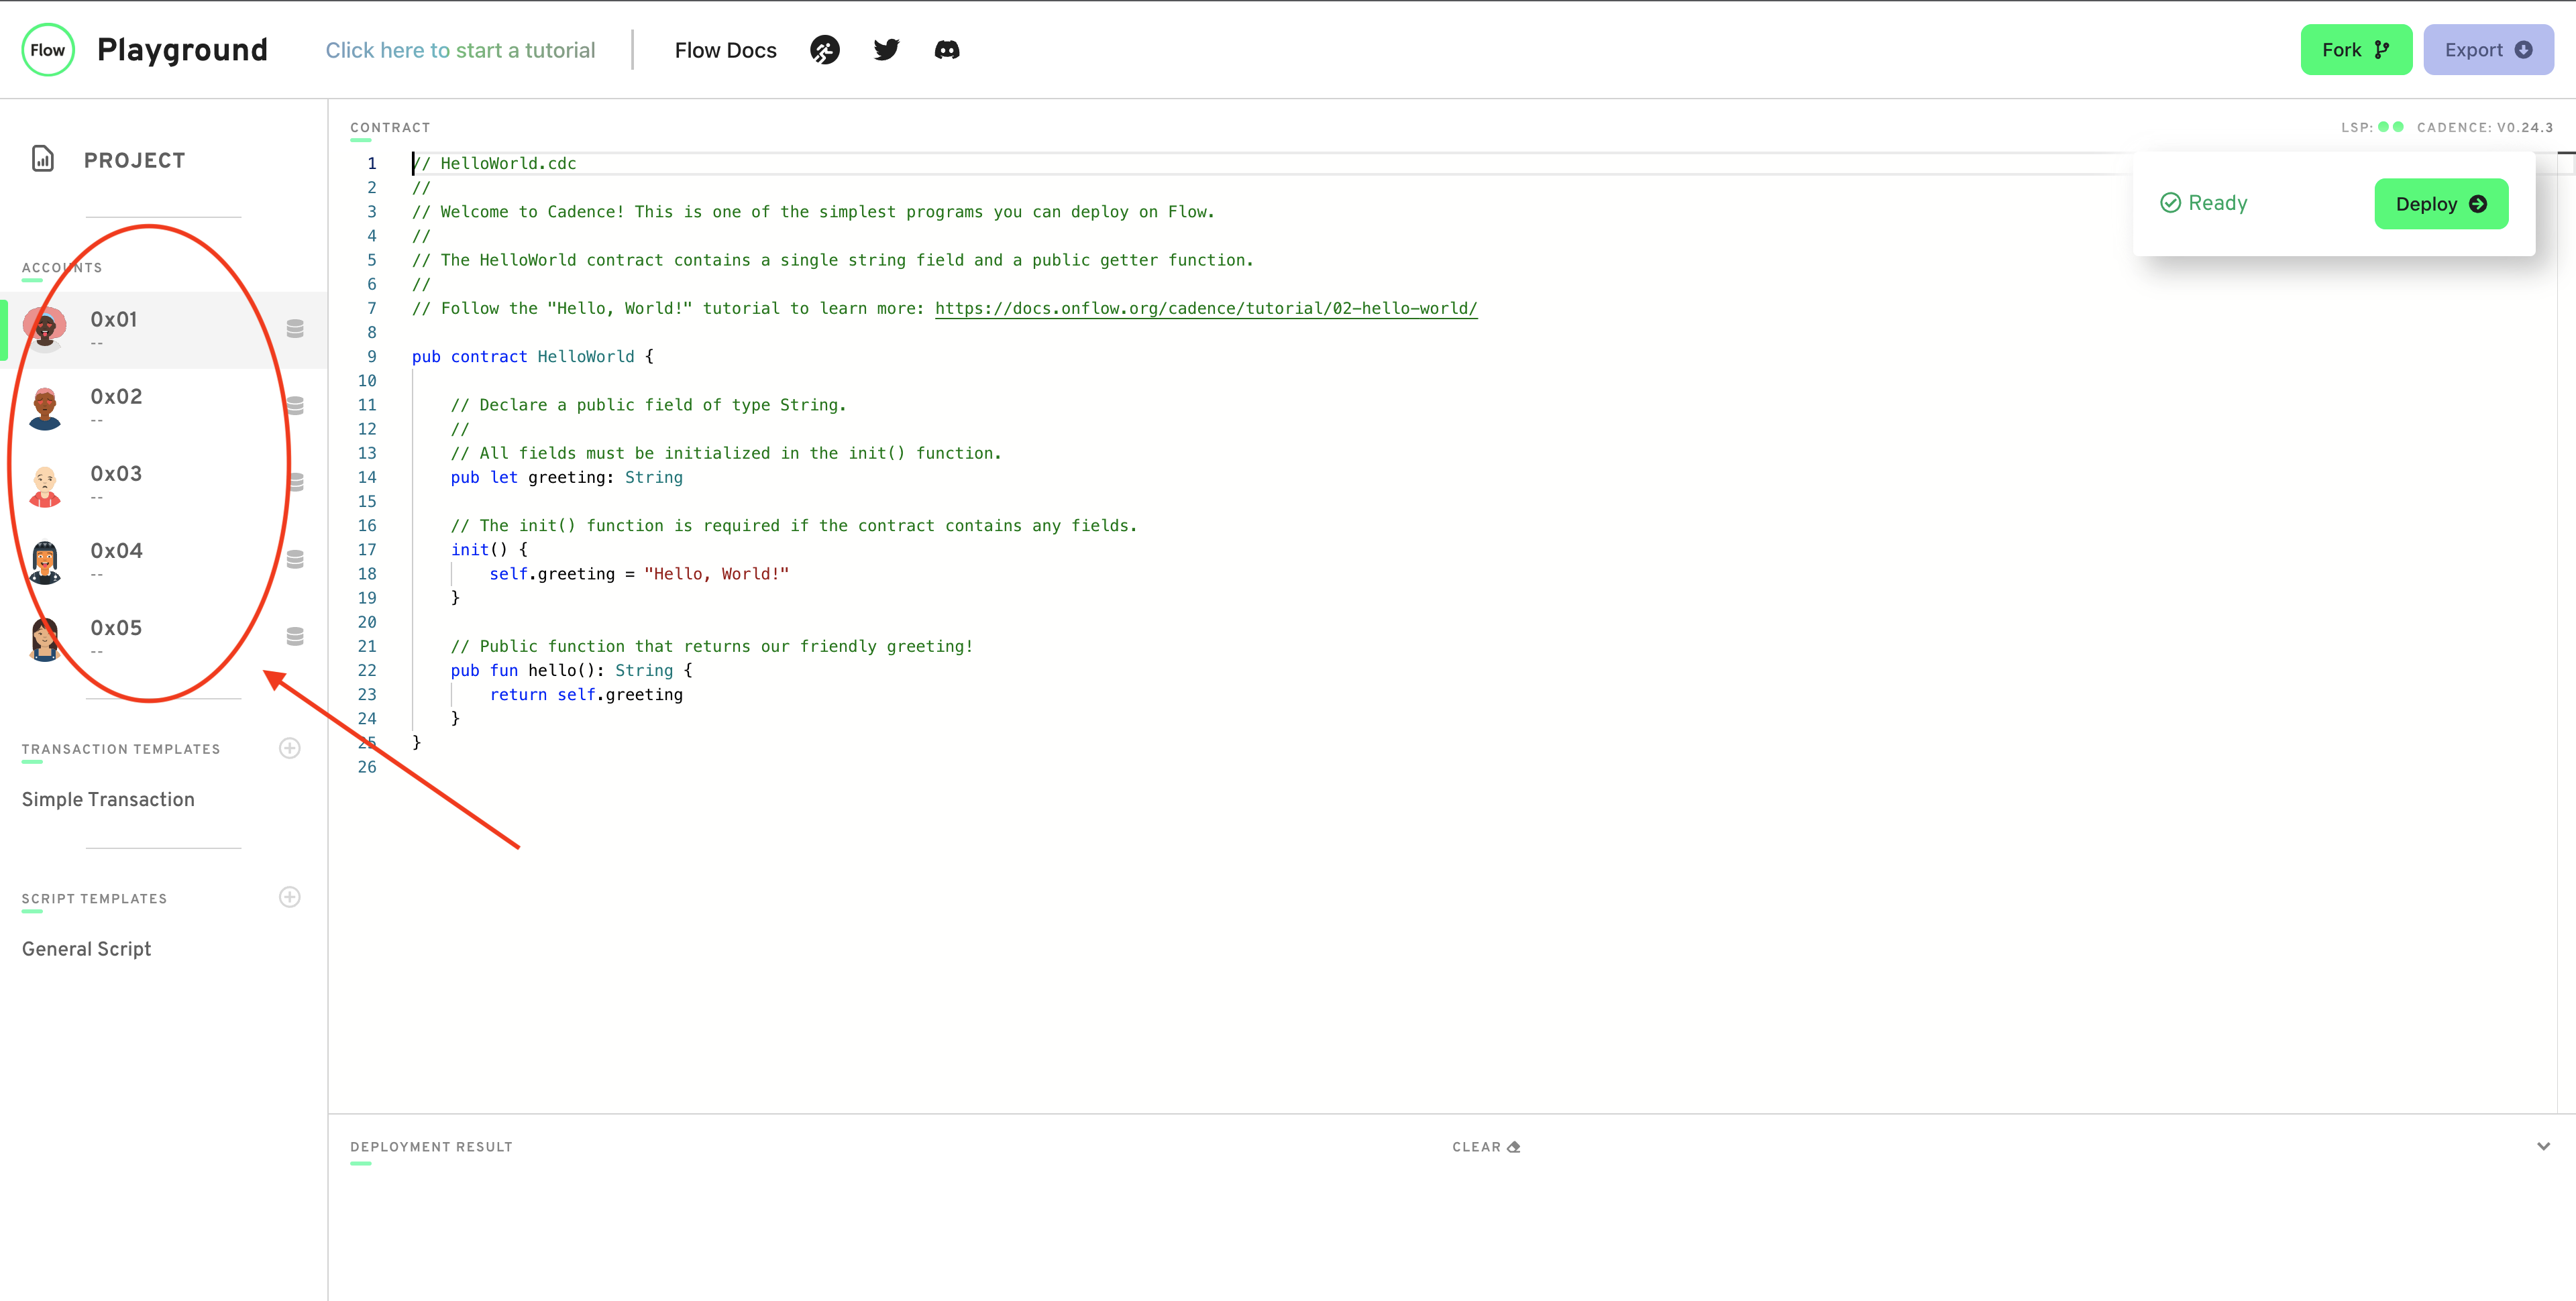
The playground is initialized with a configurable number of default accounts when you open it.
In the playground, you can select accounts to edit the contracts that are deployed for them by selecting the tab for that account in the left section of the screen. The contract corresponding to that account will be displayed in the editor where you can edit and deploy it to the blockchain.
Upgrading contracts that are already deployed is very risky, so be careful!
Transactions
Once a contract has been deployed, you can submit transactions to interact with it. In the transactions selection section on the left side of the screen, you can select different transactions to edit and send. While a transaction is open, you can select one or more accounts to sign a transaction. This is because in Flow, multiple accounts can sign the same transaction, giving the access to their private storage. If multiple accounts are selected as signers, this needs to be reflected in the signature of the transaction to show multiple signers:
// One signer

transaction {
    prepare(acct1: AuthAccount) {}
}

// Two signers

transaction {
    prepare(acct1: AuthAccount, acct2: AuthAccount) {}
}
If you want more practice, you can run some of the previous transactions on new accounts to explore some different interactions and potential error messages.
Fungible Tokens on Flow
Now that you have written and launched your first smart contract on Flow, you're ready for something more complex!